Black currant fell in love with summer residents due to its unpretentiousness to the soil and the ability to survive freezing to -25 degrees without preparation.
But you can count on getting a full-fledged harvest only with the timely care of berry bushes.
Table of contents
Is it necessary to cook black currants for winter in the Moscow region, in the Urals and in Siberia?
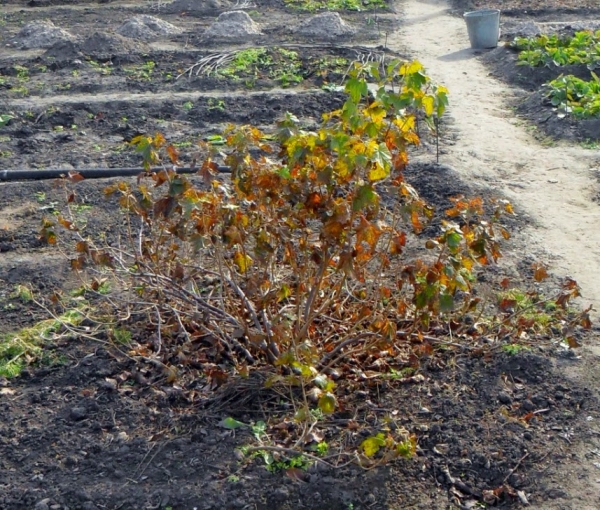
With proper care, it can produce yields up to 15-20 years.. The first few seasons of active fruiting summer residents can count on picking large berries without extra work.
But with time bush grows old branches give meager harvest and hinder the access of sunlight to young shoots.
Together with that soil depletion occursand there is a lack of nutrients in the plant. Branches and roots are damaged by pests and fungal diseases.
Comprehensive preparation of black currants for winter carries a number of advantages:
- Increase yield.
- The absence of old branches allows young shoots to receive a sufficient amount of light. Berries grow larger and more rich in vitamins.
- Digging helps get rid of pests, smooth out the effects of frost and retain moisture.
- The plant will be able to safely winter.
- From the improved bush it is much more convenient to harvest.
- Due to regular “rejuvenation”, it is able to bear fruit for up to 15–20 years.
How to help berry bushes to winter?
This will require to cut the bushes, prepare the soil, apply fertilizer and bend the branches to protect them from freezing and damage during strong winds.
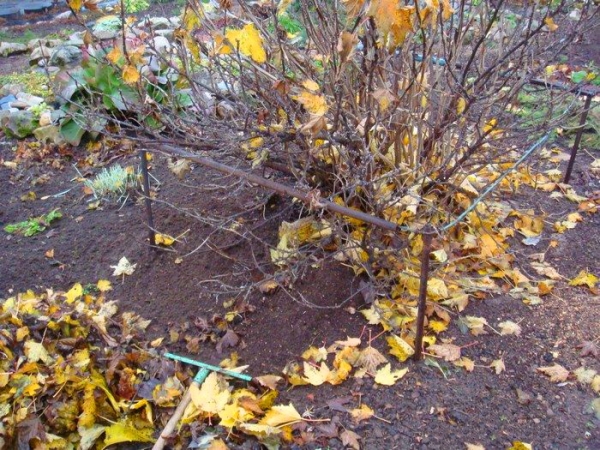
Bending down the branches of a bush
Despite the high frost resistance of this garden crop, when the temperature drops below -25 degrees, shoots freeze and start to die. This can lead to a significant reduction in yield or even death of the plant.
To avoid this, you need to bend the branches to the ground. This can be done in several ways.
The easiest way is to crush shoots to the ground with bricks.. To do this, you need to group the branches in 3-5 pieces, alternately bend the bundles to the ground, put a board on them and press it with a brick.
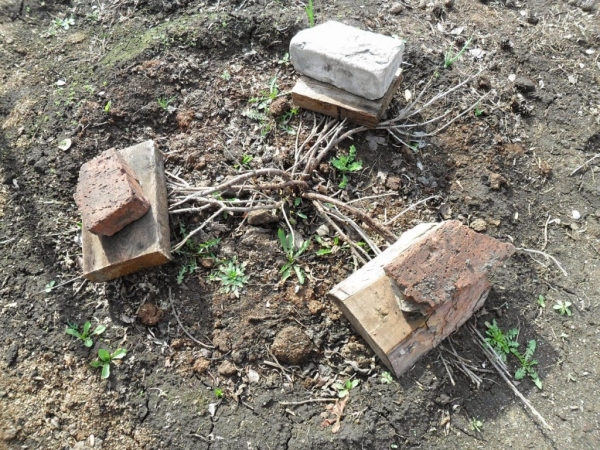
But better for that use non-metallic shingles, placing the stems in its furrows. The branches grow in different directions, they need to be bent in this direction, having no more than 2-3 shoots under one load. Otherwise, they may be subject to excessive fracture.
Burying. This method is used by gardeners who are faced with frosts below -35 degrees, when there is no snow layer on the soil. In this case, the plants need to cover with a layer of soil in 10 cm.
But, since the bush must be able to breathe, icing up this protective cushion can damage it.
Pruning in the fall
This the procedure is carried out after the leaves fall. The following branches are subject to removal:
- dried and diseased;
- old dark brown thick stalks;
- superfluous, least strong young shoots. Thin branches will be harder to winter, they will become an extra burden on the root system.
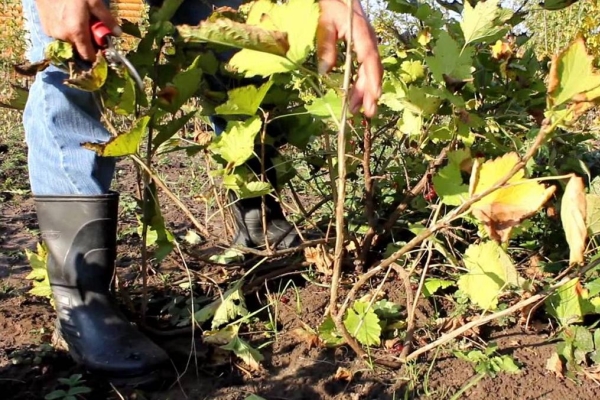
For trimming old and thick branches may require the use of saws on wood, and for removal of young shoots there is enough secateurs or garden shears.
Need to leave the strongest, fruitful, not shading each other stems, and young zero (root) shoots located near the main trunks.
Excessively thin branches will hardly survive the winter and will not delight the gardener with a high yield, and will only load the root system.
Pruning needs to be done off the ground.. When the stumps protrude above the ground by more than 2–3 cm, they often start growing again.
Total bush should contain about 14-16 shoots. 3-4 stalks from 1 to 3-4 years old. Timely replacement of old stems with new growths will help maintain yields for many years.
Tops of zero shoots need to be shortened, as well as dying tips on older shoots. This will contribute to abundant spring branching.
Trimming is also needed as a preventive measure against fungal and other diseases. Deleted residues are recommended to burn.
Pruning of black currant bushes in autumn:
Fertilizer and soil care as a preparation stage for wintering
First you need to prepare and clean the soil around the bush. from old mulch and leaves that are a breeding ground for pests, fungal and viral diseases.
Leaves will need to be burned or placed in a compost pile far from the berry bushes.
For soil disinfection You can use the solutions of the following drugs:
- copper sulphate;
- 0.3% solution of copper oxychloride;
- potassium permanganate;
- 1% Bordeaux liquid.
If the currant bush is abundantly sprayed with a solution of urea (urea) before falling off, you can get rid of a lot of bacteria and fungi. For its preparation, it will be necessary to dissolve 100 grams of urea in 10 liters of water.
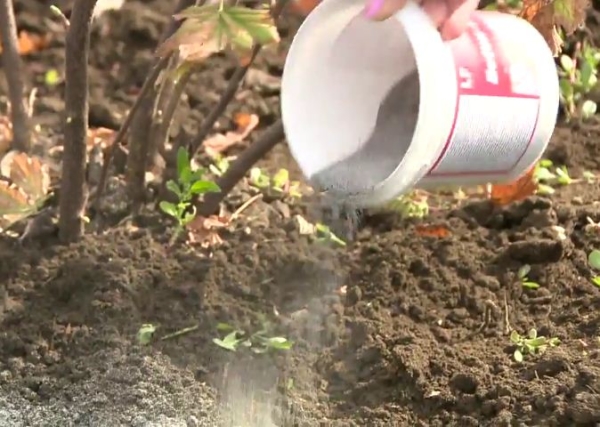
After cleaning the soil from organic remains and its decontamination you can go to digging. If you do this before frosts, you can get rid of many pests that hibernate in the upper soil layer.
Digging is carried out with garden forks. It should be combined with the introduction of 10 kg of organic matter. Light soils can be “plowed up” with special rippers.
Directly near the base of the bush, the ground can be dug to a depth of 5-6 cm, along the perimeter - up to 15 cm. It is important not to damage the roots.
If the soil is dense, its clumps need to be crushed with forks and rakes. Next, the soil can be disinfected again by spraying it with one of the previously described solutions.
Fertilizer fertilizer is produced before digging, together with it, or sprinkle fertilizer around the bush before precipitation, putting it in the ground with a ripper or a rake. In autumn, only phosphorus and potassium can be applied to the soil.
Superphosphate (50-80 grams) can be used as phosphate fertilizer. Potassium sulphate is also introduced (20-40 grams).
Wood ash contains potassium, phosphorus and many other elements, so you can replace it with mineral fertilizers or supplement them. Under the bush during digging you will need to make 100 grams (250 ml) of the substance. It can be diluted in water and immediately pour liquid over the ground.
The ash must be crushed before entering into the soil. It cannot be used together with nitrogenous fertilizers: carbamide, droppings, manure. Ash can be stored for many years, but only in a dry state, being, for example, in a closed bank.
Fertilized and loosened soil needs to be covered with fresh mulch.: compost, sunflower husk, rotten sawdust or leaves of non-crop crops in which there will be no pests threatening currants.It will save the bush from frost and prevent rapid loss of soil moisture.
When snow falls, you need to throw it on the berry bush and around itand lightly tamp. In the absence of it, the plant can be sprinkled with forest foliage, needles or covered with agrofiber.
Properly prepare without making mistakes
It is worth highlighting a few common mistakes. gardeners that they do with this:
- Introduction of fresh manure to the bush. Excess nitrogen contained in it, will cause the plant to thrive, which will adversely affect its preparation for the winter. This will make the bush more susceptible to cold weather. Manure can be spread under currants only after the onset of stable cold weather.
- Covering the bush with plastic wrap and other synthetic materials. Without air access, the plant often dies.
- Breaking off branches with hands, nippers and cutting them with a knife weakens the bush.
- Late application for currants, when it has already completed fruiting, high doses of organic matter.This leads to an abundant build-up of green mass and the laying of a small number of flower buds. The plant develops rapidly until the beginning of frosts and do not have time to prepare for them.
In the Moscow region, in the Urals and in Siberia with the first signs of the onset of spring, it is necessary to free the bush and let its stem develop and dissolve the buds.
Excessively long time the bush is under cover will make it impossible to produce enough organic matter to produce a bountiful harvest.
Prepare currant bushes for wintering: